
Cisco’s line of small business fully managed switches I think are really great for learning Cisco networking as well as having everything you need to create a really functional VMware lab at the layer 2 and 3 network level. The small business switches allow you to do many of the crucial functions for setting up a VMware lab such as VLANS, lagging, layer 3 routing, and others. Many have probably noticed the Cisco small business switches are being used more and more for labs as it is proving itself as a really great inexpensive switch option for those configuring their first lab or upgrading an older virtualization lab. The SG300-10 is even the switch in the lab giveaway by VMTurbo. I will take a deeper dive into more advanced switch configuration (VLANS, LAG, etc) in a later post, however, for those of you out there who may have this switch or thinking about purchasing, I want to go through some of the basic “get up and going” steps that you will want to tackle when getting the switch up and running to start passing traffic.
Getting up and running
By default, my switch when I unboxed and plugged into my network, simply grabbed an IP address from my DHCP server for VLAN1 which allows you to open a web browser and hit the device. So you will need to look in your DHCP scope wherever this resides and find your Cisco device. It is helpful to have the MAC address handy as this will allow you to more quickly pinpoint the device in the address leases. Once you have the address, open a web browser and point to the IP via HTTP and you will come to the login page.
Default credentials:
- user: cisco
- pass: cisco
You will be prompted to change the password. Once you have your set password, you can proceed.
Updating Firmware
Download the latest SG300-20 firmware here: https://software.cisco.com/download/release.html?mdfid=283019616&softwareid=282463181&release=1.3.7.18&flowid=18904
Updating the firmware will be one of the first things you will want to tackle. The process isn’t difficult at all, just a little non intuitive. For most of you out there who have worked with TFTP and Cisco routers, this will be easy as falling off a log. However, for those who may not be so familiar, you will need to download a simple TFTP program. I highly recommend the free TFTP server from Solarwinds as it is easy to use, simple interface, and best of all FREE.
The process is pretty straightforward and normally involves updating both the boot and image portions of the system. However, in my case, the boot image was already at the latest version which my system imagewas behind. So, for purposes of the update on my switch, I simply updated the system image and left the boot alone.
This may be a little bit confusing – why the two images? The boot image is a subset of the Cisco IOS software that is used when network booting when loading IOS images onto a device or when the system image has been corrupted, while the system image is the full IOS that usually runs the switch
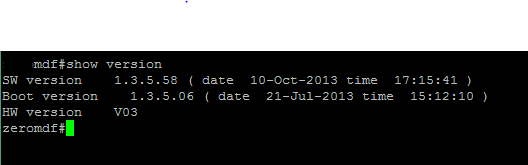
After setting up the TFTP server, you can now use it as a source for pulling the boot and system images for your switch. First things first though, let’s check the versions of images on our Cisco switch.
- To do this, you issue the show version command
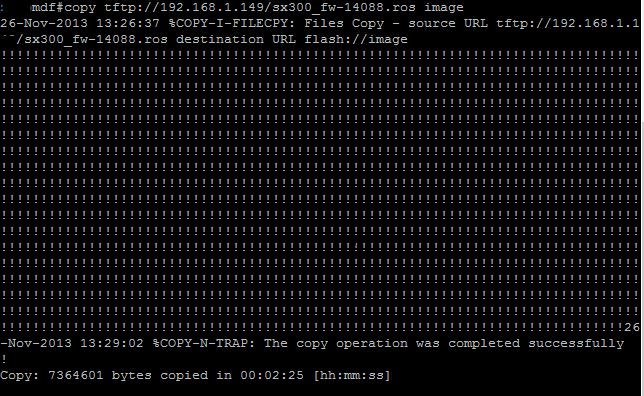
- In my case, the system image was the portion that needed to be updated. So the command for updating the boot image:
copy tftp://192.X.X.X/sx300_fw-14088.ros image
If you need to update the boot image the syntax for that is:
copy tftp://192.X.X.X/sx300_boot-13506.rfb boot
copy tftp://192.X.X.X/sx300_boot-13506.rfb boot
Now that we have the system image uploaded, we can look at the system images available by the command: show bootv
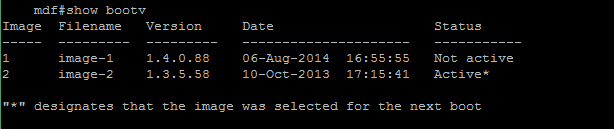
To change the system image to the one we just uploaded, issue the command boot system image-1 which image-1 being the slot that your new firmware resides in.
Now we need to reset the system…issue the reload command.
Changing the mode
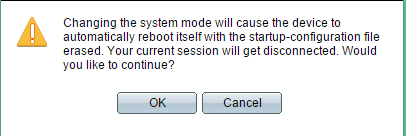
In order to take advantage of VLAN routing and other nice features we want to use, we need to change the mode of the switch to Layer 3. This is done under the system settings portion of the management interface in the Web view.
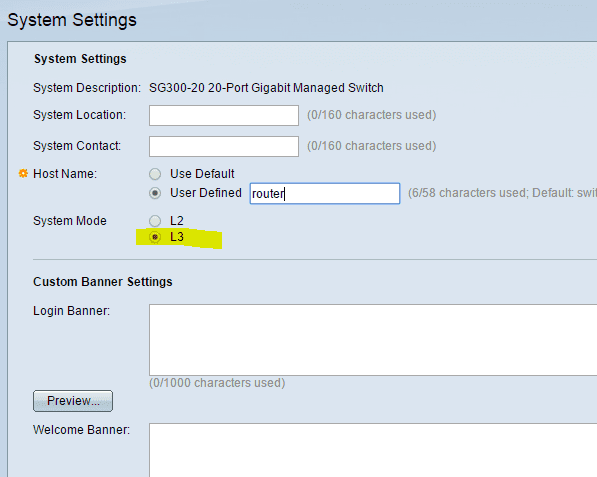
You get the warning that changing the system mode will cause the system to be rebooted, so be ready for the disconnection. You can initiate a continuous ping at this point to see when the device comes back up.
Change Password Again
One interesting caveat to changing the switch mode is that your password is now changed back to the default:
user: ciscopass: cisco
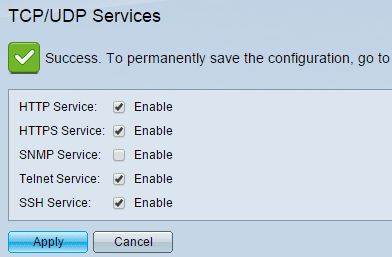
Once you hit the IP with the web interface, change your password again. One thing I wanted to do was enable SSH and telnet for connecting. To do this, you go to the Security menu and then TCP/UDP Servicesand you will see the below screen over in the top right panel.
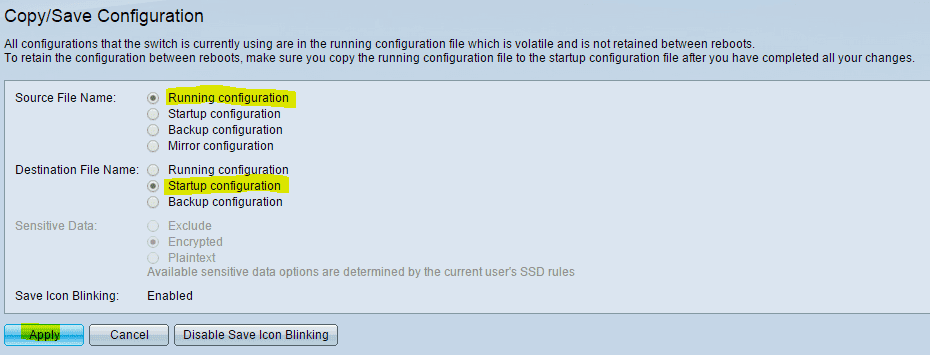
You will also need to copy the running configuration over to the startup configuration which it will nag you to do.

Setting a Static IP address
The best way to set a static IP on the SG300-20 is to use the CLI interface. In fact in the web view you can’t change the static IP address you want – you can simple change it to static, but it will use the IP that it has already grabbed from DHCP. To change to a static address, issue the commands:
show ip interface
config t
int vlan1
ip address 192.X.X.X 255.255.255.0
show ip interface
config t
int vlan1
ip address 192.X.X.X 255.255.255.0

Well there you have it. Once you have followed the above steps, you will have an up to date switch firmware, password set, IP address assigned, and network services enabled that you may want to use for connecting.


0 Comments