If you are like me, you may interact with multiple network segments and VLANS configured for different purposes. However, what if you have a workstation that is not configured with an Intel ProSet card with enterprise software that allows tagging multiple VLANs? Is all hope lost if you have just a generic card that is not of the Proset or Broadcom enterprise variety that lacks the software for VLAN tagging? Let’s take a look at VLAN tagging software for Windows 10 and see how you can effectively do this without an Intel Proset or Broadcom card with the enterprise driver set.
Why do you need to tag multiple VLANs?
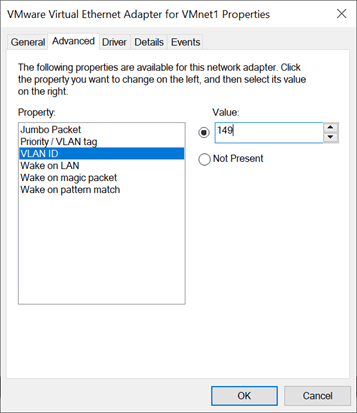
You may wonder, in Windows 10 you will most likely see under the advanced settings for the adapter configuration you have the ability to populate a VLAN ID. Isn’t this all that is needed? Yes, you can tag a single VLAN. This means that you can tag your traffic for a specific VLAN. For many Windows 10 users, this may suffice and be all you need.
However, if you are like me, you may have multiple VLAN segments associated with your home lab environment and need to have the ability to place your workstation into those multiple VLAN segments at a Layer 2 level. You may wonder – why wouldn’t you just rely on a Layer 3 route to take care of connectivity between segments? You can do that and arguably it is more efficient and less problematic to route traffic at layer 3 for most use cases.
However, as a case in point, what if you are running an installation of VMware Workstation and you have multiple VMs that you want to be placed in different segments of your network and acquire a DHCP address from those various segments? For that, you need to be able to tag multiple VLANs.
VLAN Tagging Software for Windows 10
In case you have a workstation running Windows 10 and need to be able to tag multiple VLANs, there is a way to do this without installing third-party software or a shady utility. You can do this by installing Hyper-V in Windows 10.
Even if you don’t plan on running any virtual machines on top of the Hyper-V platform, installing Hyper-V and the PowerShell cmdlets allows creating virtual network connections that CAN tag specific VLANs and tag multiple VLANs.
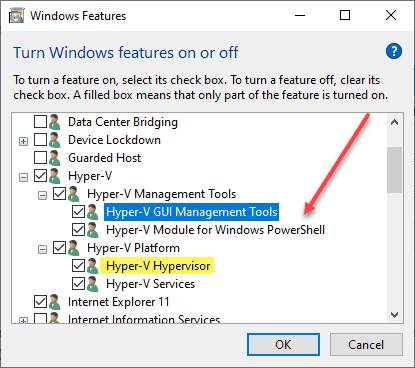
Run the optionalfeatures command to quickly get to the Windows Features. Be sure to install Hyper-V and Hyper-V module for Windows PowerShell.
After installing Hyper-V, you will be prompted to reboot. After
rebooting, you should be able to run the Hyper-V PowerShell cmdlets.
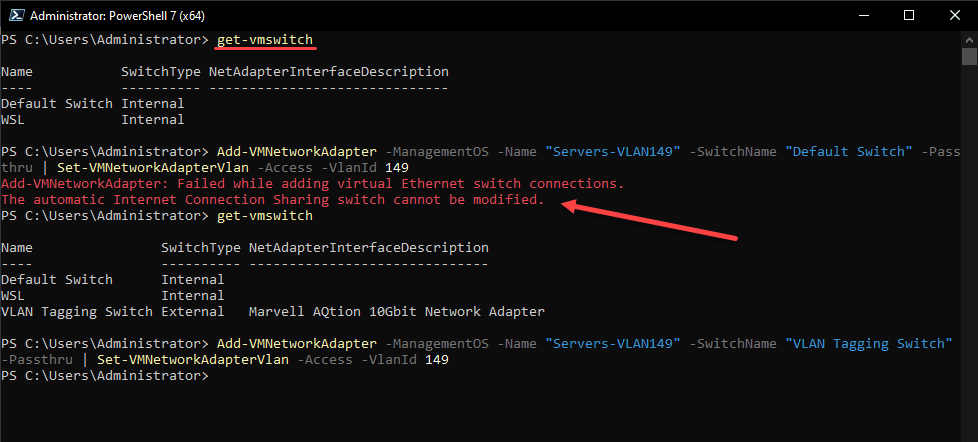
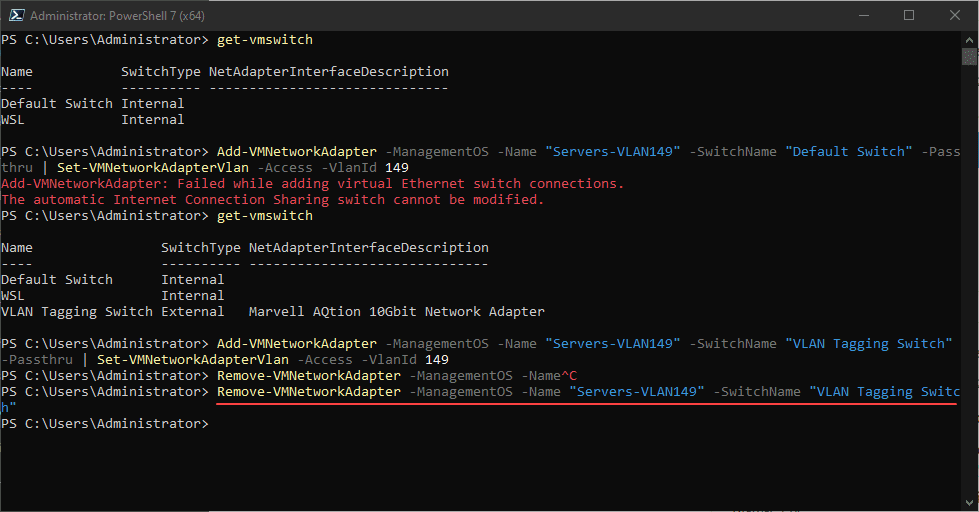
Notice below, you can see the virtual switches installed by running the
command:
get-vmswitch
With the Hyper-V platform installed, you can add virtual switches and adapters that will allow tagging specific VLANs. As you see below, you can’t add this to the Default Switch. Rather, you need to add a new Hyper-V virtual switch and pass this into the Set-VMNetworkAdapterVlan command.
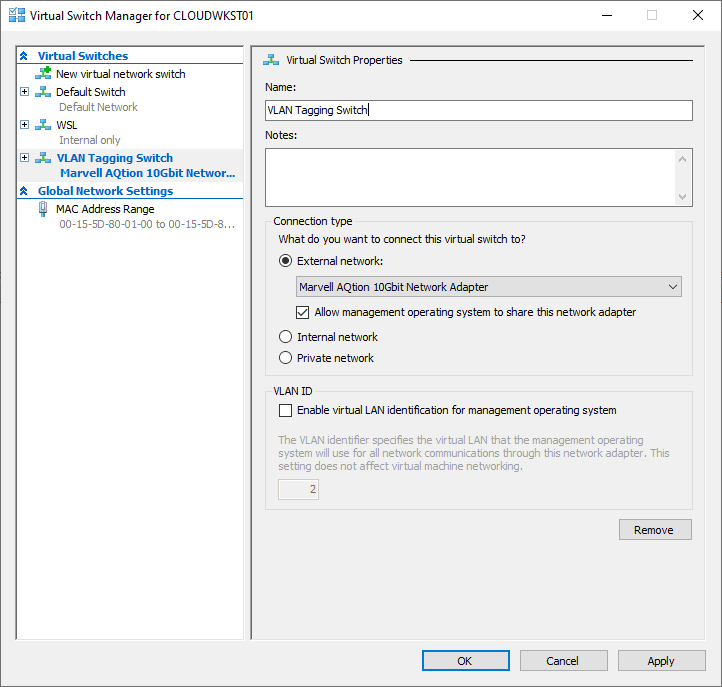
Add-VMNetworkAdapter -ManagementOS -Name "Servers-VLAN149" -SwitchName "VLAN Tagging Switch" -Passthru | Set-VMNetworkAdapterVlan -Access -VlanId 149You can also use the Hyper-V Manager console and the Virtual Switch Manager to add a new virtual switch and then select to Enable virtual LAN identification for management operating system to define the VLAN tag for the virtual switch.
A bit of irony here, but to go along with the example I gave above with VMware Workstation, you can create a bridged connection in the Virtual Network Editor that is bound to one of the Hyper-V virtual switches tagged with a specific VLAN. In this way, your VMs running in VMware Workstation can be placed on the specific VLAN segments they need to communicate with easily.
Also, you can easily remove the virtual network adapter setup for this purpose by using the command:
Remove-VMNetworkAdapter -ManagementOS -Name "Servers-VLAN149" -SwitchName "VLAN Tagging Switch"Adapter Precedence and routing
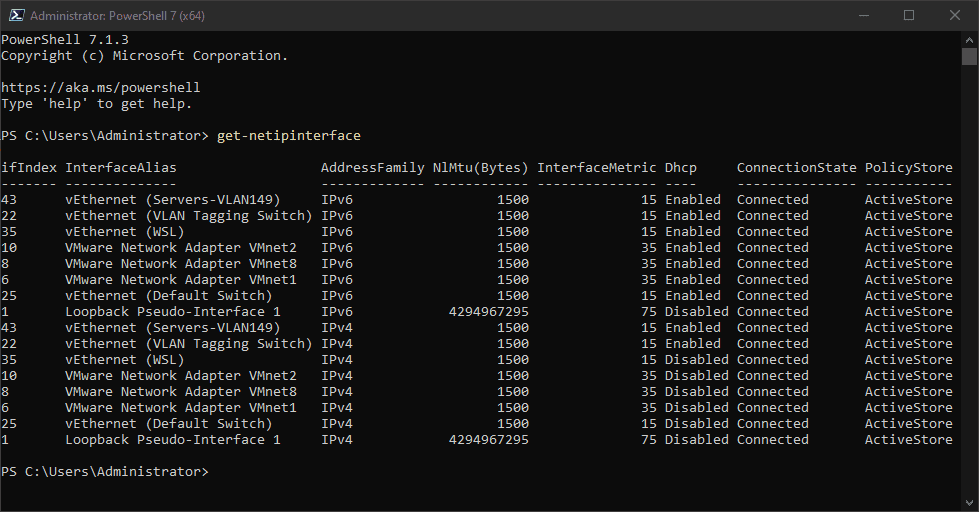
One little oddity I ran into when I added the new adapter via the Hyper-V virtual switch, I started having a few routing issues from my workstation. One thing I noticed, a subnet that I was able to ping before, was now unreachable. What gives? Adapter precedence. After a bit of troubleshooting, I figured out the traffic was now using a different adapter for the primary interface for communicating out.
You can tweak this behavior by setting interface precedence. In Windows 10, this is easily done using PowerShell. Before setting the precedence, you can get the information you need using the Get-NetIPInterface command. Using this cmdlet, you can see the ifIndex and the InterfaceMetric, both of which you will need to set the precedence.
If like me, you lose connectivity after adding the Hyper-V virtual switch tagging a specific VLAN, there is a good chance the new adapter has become your primary interface and may be causing issues with your connectivity. Using the Set-NetIPInterface cmdlet allows easily setting the precedence of your adapters. Find the adapter you want to be the primary or the one that was primary before and use its InterfaceIndex to set the InterfaceMetric to a lower value than all the other adapters.
Set-NetIPInterface -InterfaceIndex 22 -InterfaceMetric 10 Wrapping Up
If you don’t have a fancy network adapter like an Intel ProSet or Broadcom card with the enterprise drivers and fully-featured capabilities such as VLAN tagging, you do have VLAN Tagging Software for Windows 10 with Hyper-V installed. Installing Hyper-V provides the virtual interfaces needed for Windows 10 to use these along with VLAN tagging. You can have multiple virtual adapters as a result of configuring these in Hyper-V using either PowerShell or the Hyper-V Manager that provides the multiple VLAN tagging capabilities missing in regular Windows 10 network adapter properties for VLAN tagging.


0 Comments