Many of us run VMware home labs and these no doubt have many different architectures and hardware configurations across the entire landscape, and that is great! There is no one single way to configure a home lab the “right way” as everyone’s needs and use cases are different. One of the critical components of a home lab vSphere environment and really any vSphere environment is the network. How do you design your VMware home lab network? Let’s take a look at a few varieties of the VMware home lab network design and see what potential options may work for your use case.
VMware Home Lab Network Design
As mentioned there are many different possible designs for the VMware home lab network. If you are designing your first home lab network, what are the possible options for your design? There are many. However, I want to highlight and focus on the following three designs:
- One host with isolated virtual networks
- One host with virtual networks for nested environments connected to a virtual router
- Multiple hosts with VLAN trunking on a physical switch
- Routing considerations
One host with isolated virtual networks
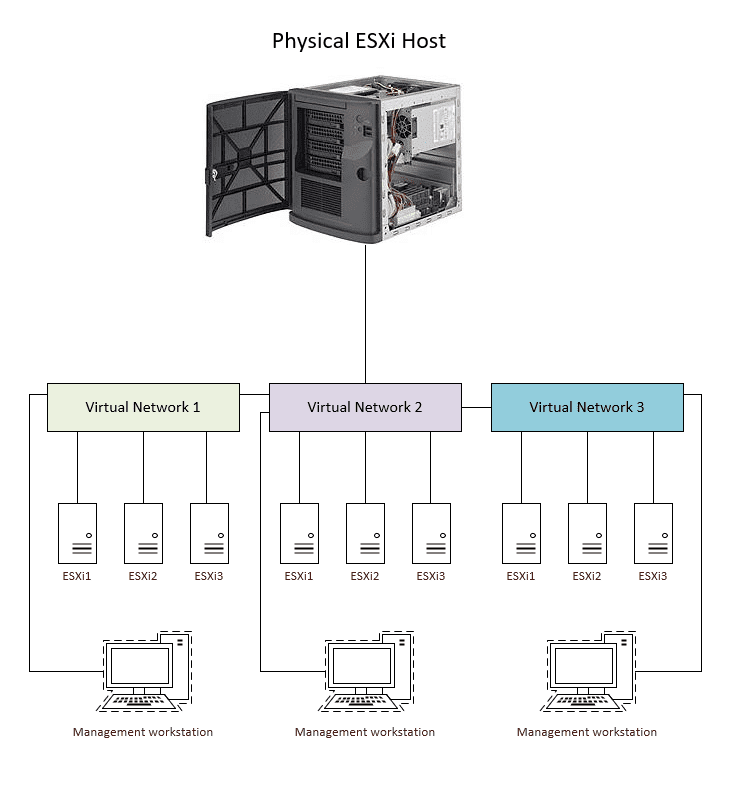
The first design I would like to explore is the single host with nested labs design. This is a popular environment for many as they enter the world of home labs as it provides the means for a dedicated lab, without the need for multiple physical hosts. So, this saves the upfront cost of buying and provisioning multiple physical ESXi hosts. It also allows you to take care of the networking design “in the box” so to speak. All of your networking for your nested hosts and nested workloads exist inside the virtual environment provisioned by the physical ESXi host.
This makes managing your home lab network design easier from a few standpoints. All of the management happens in a single location and it makes it easy to have this software-driven. You can use various tools such as PowerCLI and others to manage, create, add, remove, etc the networks for your nested lab.
One thing to consider, when you have isolated nested networking, you won’t have a way from a single management workstation to be able to connect to the resources in each isolated network, if these are on different address spaces. So you would have to have a management workstation VM inside of each isolated virtual switch, and you would need to access the environments using the Remote Console like so. Each virtual network will have its own VLAN ID assigned so as to isolated them. Alternatively, you could have these networks configured as truly isolated switches without a physical network adapter assigned.
One host with virtual networks for nested environments connected to a virtual router
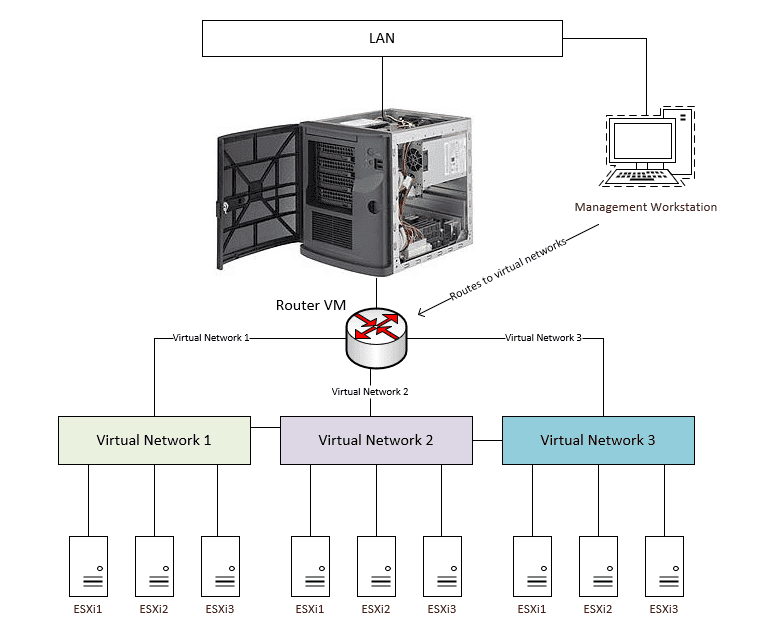
However, this approach may be cumbersome from a management and access perspective. You can easily allow access to your virtual networks assigned in each virtual network on your single ESXi host by using a small footprint virtual router. The virtual router would have a link attached to each virtual network. Then, you would have routing in place from your management workstation located on your LAN to reach the networks. The “next-hop” address would be the virtual router.
As a note, this approach doesn’t really change if you are using nested labs or traditional virtual machines running on your single ESXi host connected to vCenter. You will need a way to connect to any address space outside of the segment your management workstation lives on.
Multiple hosts with VLAN trunking on a physical switch
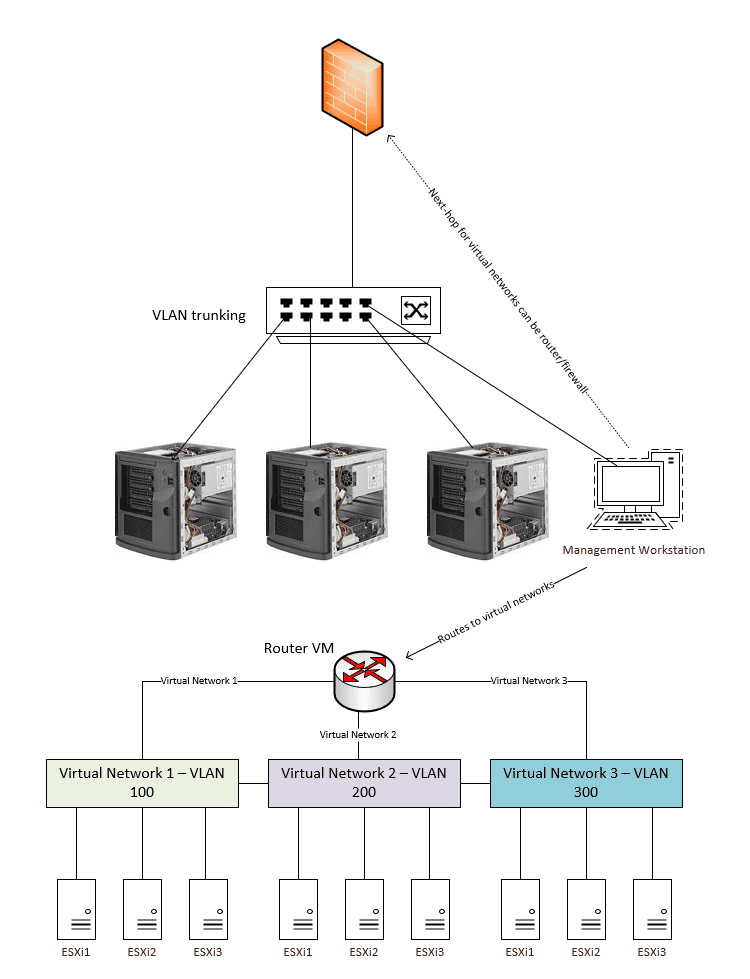
If you have multiple VMware home lab ESXi hosts and you want to spread the virtual networks between the ESXi hosts so that you can have the same virtual networks on each host and those networks talk to one another, you will need to use a physical network switch. Using VLAN tags assigned to each virtual network, you would have the same VLAN IDs configured on your physical network switch so the ESXi uplink ports would be tagged with the virtual network VLAN IDs.
This allows connectivity between the hosts for each respective virtual network backed by a VLAN ID. You can still make use of a virtual router appliance to route traffic as well. Note, with network connectivity between the hosts, you would only have to have the virtual router on a single host and not duplicated between the hosts.
Also, you can choose to either create a static route on your management workstation pointing directly to the virtual router, or you can have the default gateway that you have in your environment forward the next hop address for the subnets configured in the virtual network environments.
Again, this approach comes into play with both nested environments and traditional VMs existing on a specific virtual switch and address space backed by a VLAN.
Routing considerations
As shown above, as part of your design, you have to take into account routing considerations. Routing your traffic makes it easy to manage your multiple lab segments from a single point such as a management workstation on your main LAN segment, which is what most will want to do. You can have totally isolated home lab networks and this works just fine. However, keep in mind the additional management and access challenges that will result from your lab being totally isolated.
Even with a single ESXi host that houses all your lab environments, routing traffic to your virtual network segments is a great way to easily access and manage the environment. You can use any type of virtual routing appliance that you prefer to do this. It doesn’t have to have any features besides the ability to route traffic.
Wrapping Up
Your VMware Home Lab Network Design can vary depending on your needs and how you want to be able to manage and access your environment. Completely isolated networks that may not even have a physical network adapter attached can be a viable option to simply have isolated isolated environments that make use of a management workstation within the environment.
If you want to have a better experience accessing and managing your VMware home lab environment, you can setup simple routing from your LAN either by creating static routes on your management workstation that point to your virtual router appliance, or you can create the next-hop address at your default gateway appliance or physical device to achieve the same purpose. This is a better approach if you have multiple devices you want to be able to access the lab subnets. Post in the comments below if you have any questions on the information presented or you have a design you would like to mention or toss out there.


0 Comments