How is your Kubernetes journey kicking off in 2022? While Kubernetes is already wildly popular it is feeling more like 2022 and beyond is going to be the year that modernized applications are going to really take off in the enterprise. Kubernetes is one of the main reasons behind the huge transition to microservices architecture in the enterprise and businesses are adopting K8s at a rapid pace. For infrastructure admins, Kubernetes is definitely the skill to pick up among other skills, including DevOps, automation, and others. One of the hurdles to Kubernetes is just getting Kubernetes configured. There are many options out there from manually configuring Kubernetes yourself, VMware Tanzu, cloud service provider Kubernetes offerings, and others. Lately, in the home lab, I have been playing around a good bit with Rancher. In this post, let’s take a look at how to create Kubernetes cluster with Rancher and VMware vSphere.
Why use Rancher with VMware vSphere?
You may be wondering why you would want to use Rancher with VMware vSphere and not use VMware Tanzu or another solution? Well, in my opinion, there is never a solution that just automatically fits EVERY business and EVERY situation and use case. Some solutions align better with a particular business and use case. I like to have options, especially as an architect to design solutions that best fit the customer’s needs.
I think Kubernetes is like everything else. There are a lot of great products and solutions that allow solving complex technical challenges with the platform. With that said, Rancher is a great Kubernetes orchestration and management platform that is open source and easy to use. Its time to value is short and the learning curve is very easy. You can be up and running quickly and start building Kubernetes-driven containers in no time. It allows seamlessly scaling up and scaling down your clusters, importing and managing your other clusters, and provides an “app store” of sorts to easily install applications in your Kubernetes clusters. See my blog post here, Rancher connect to existing cluster to see how this is done.
Create Kubernetes Cluster with Rancher and VMware vSphere
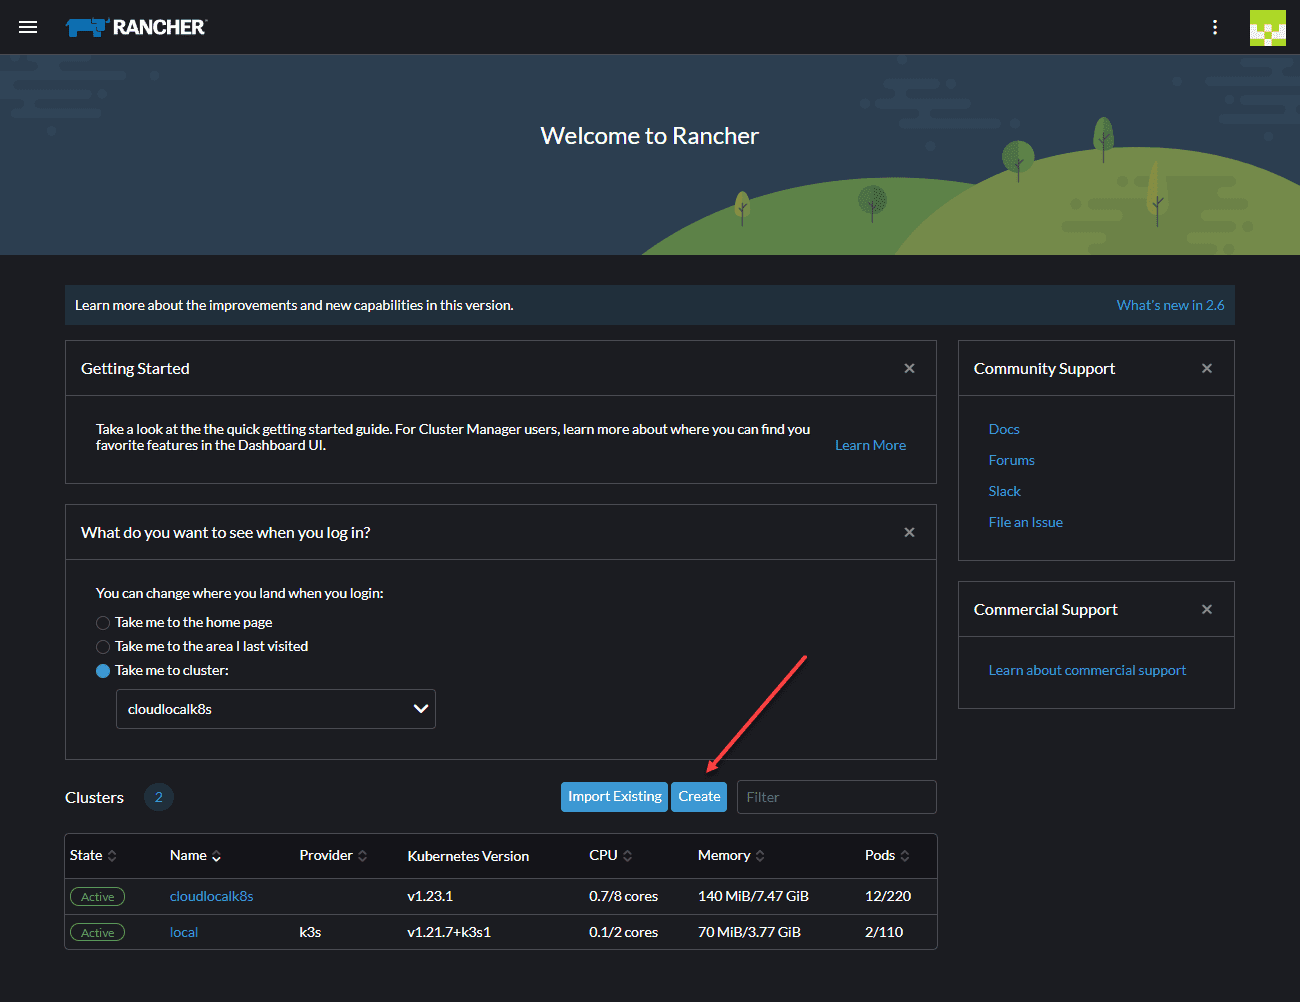
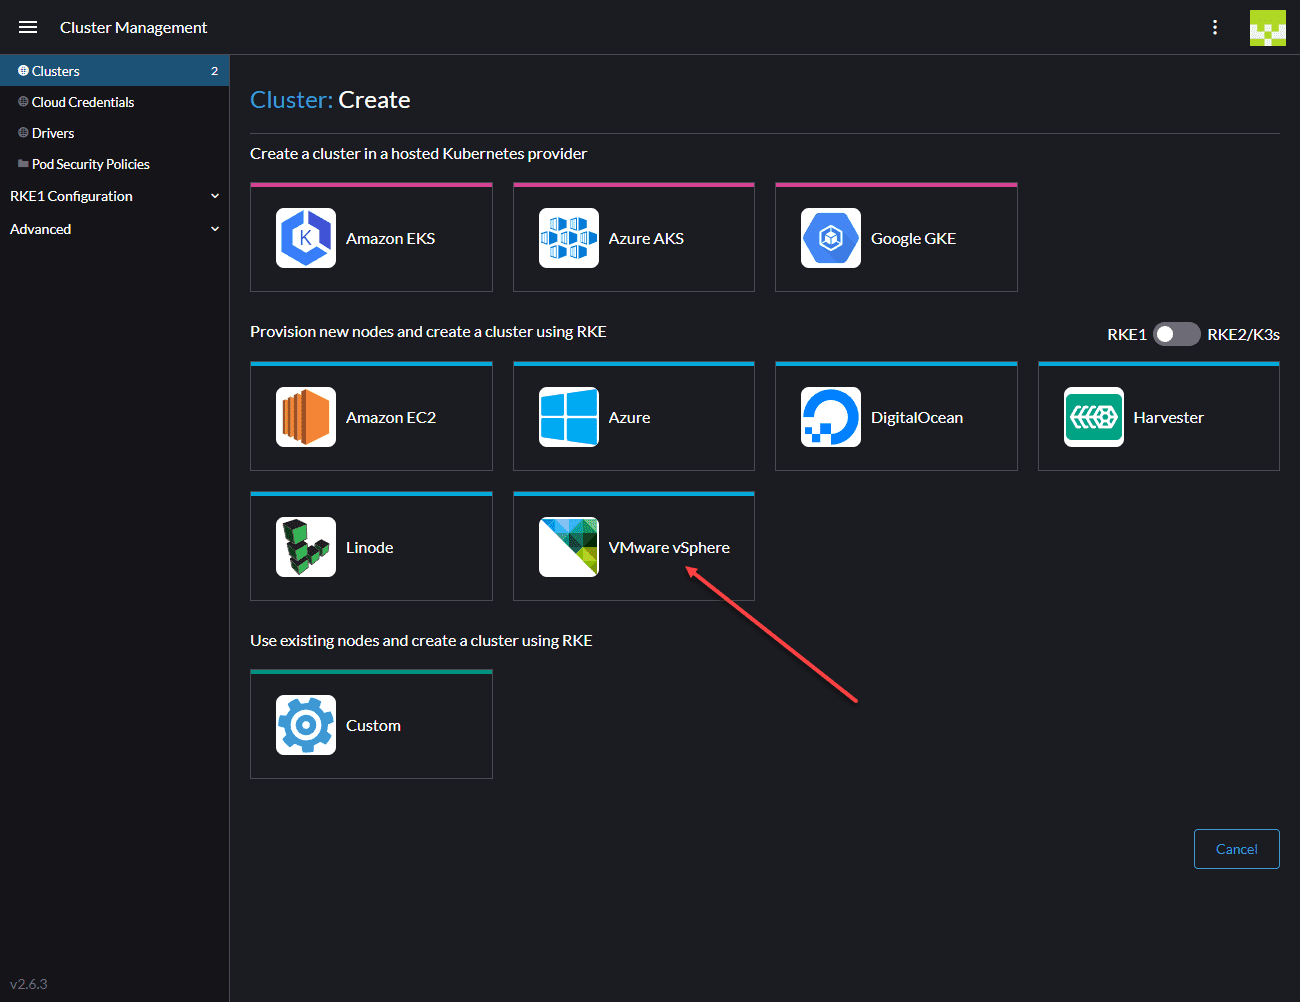
Now, let’s get to the process of how to create Kubernetes cluster with Rancher and VMware vSphere. To begin creating the Kubernetes cluster in vSphere with Rancher, you navigate to either the Home dashboard or the Cluster Management screen. Below, I am navigating to the Home screen and choosing the Create button. When you click the Create button, you are telling Rancher you want to provision a new cluster using a supported infrastructure provider, which includes VMware vSphere.
This takes you to the Cluster Create screen where you can choose to create a cluster in a hosted Kubernetes provider. Click the VMware vSphere tile.
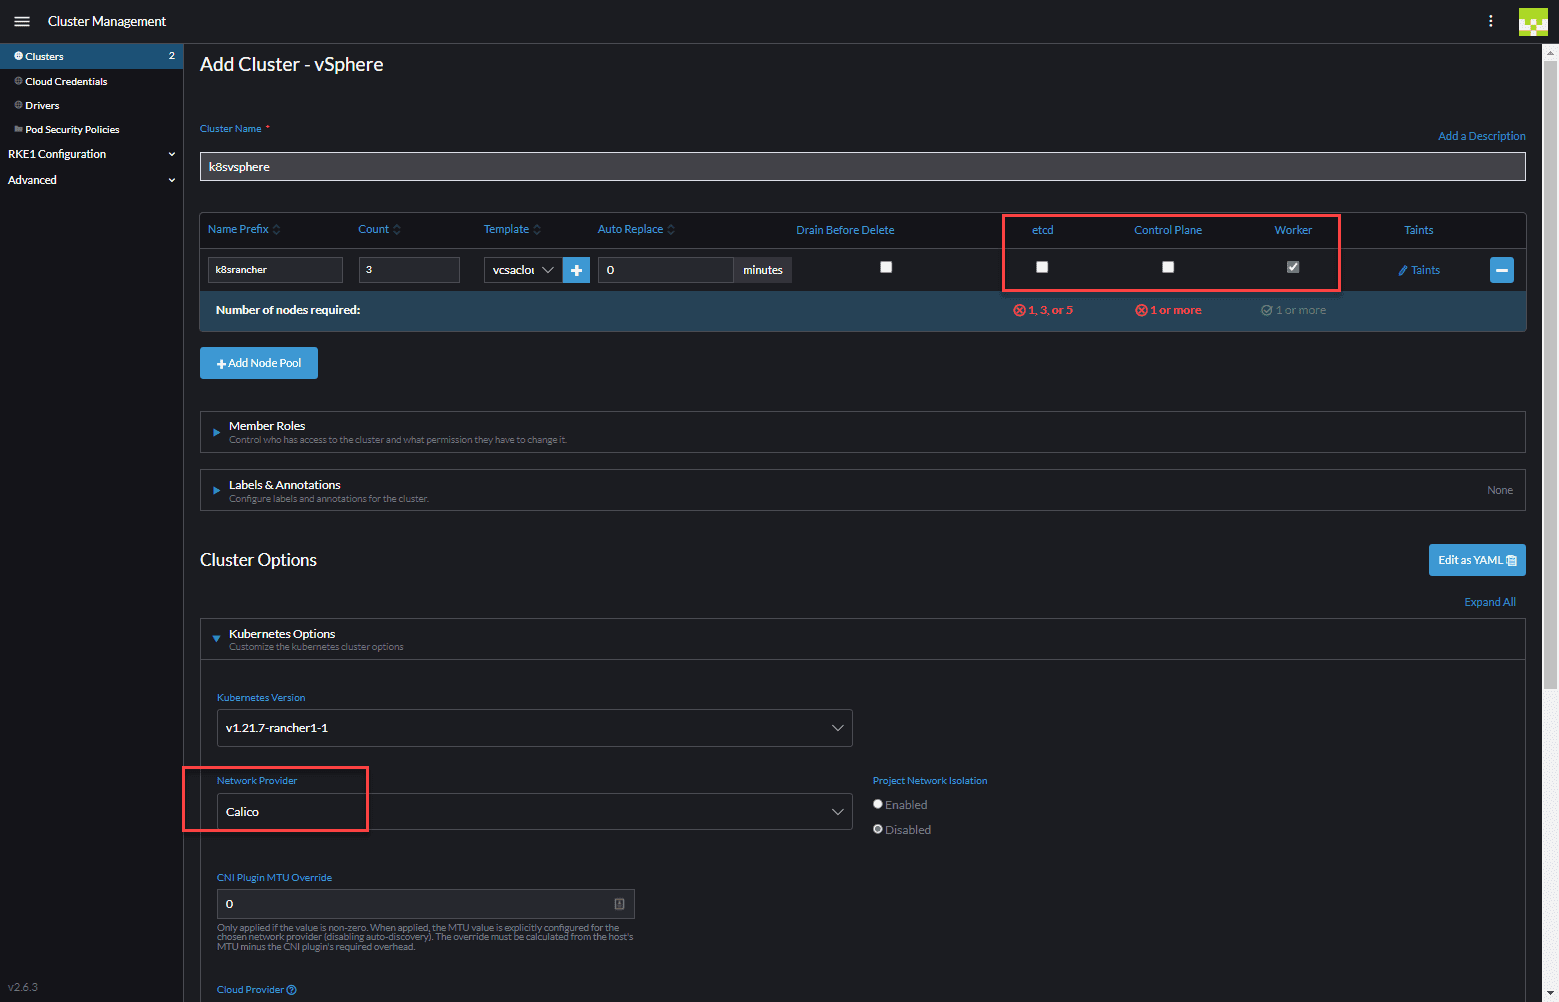
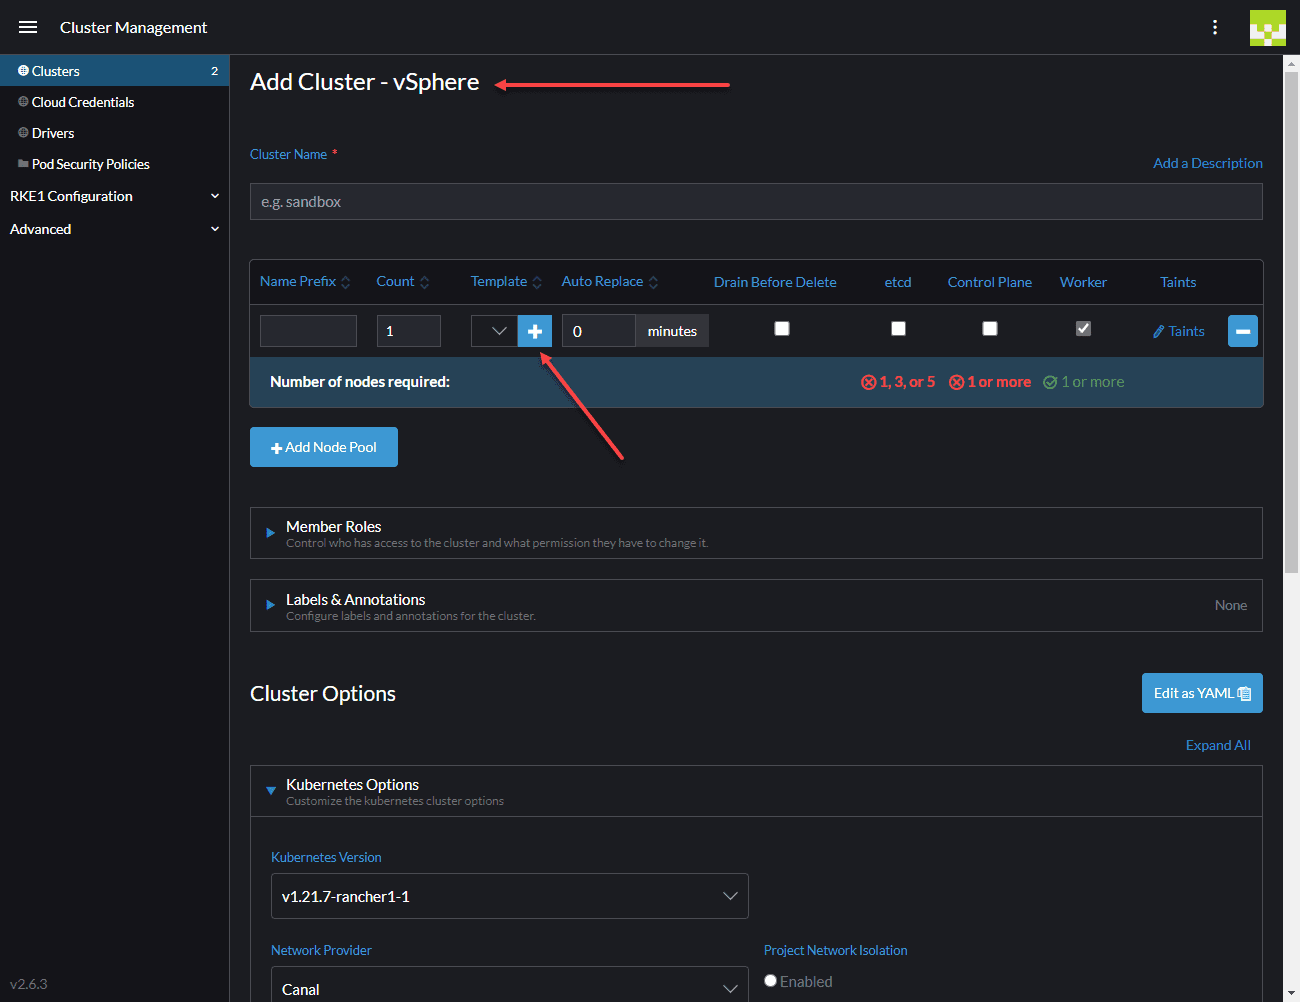
This takes you to the Add Cluster – vSphere screen. The configuration screen for adding a new cluster is fairly busy. There are a lot of points to take note of. You need to give the cluster a name which is the friendly name found in Rancher for management purposes. The next bit of configuration at the top of the dialog box includes configuring a pool of nodes and setting a node template for the pool of nodes you create.
As you can see below, in the node pool, you can choose the “roles” you want the nodes to house, including:
- etcd
- Control Plane
- Worker
To create a new Node Template for creating the nodes in your pool, click the “plus” button under the Templates column.
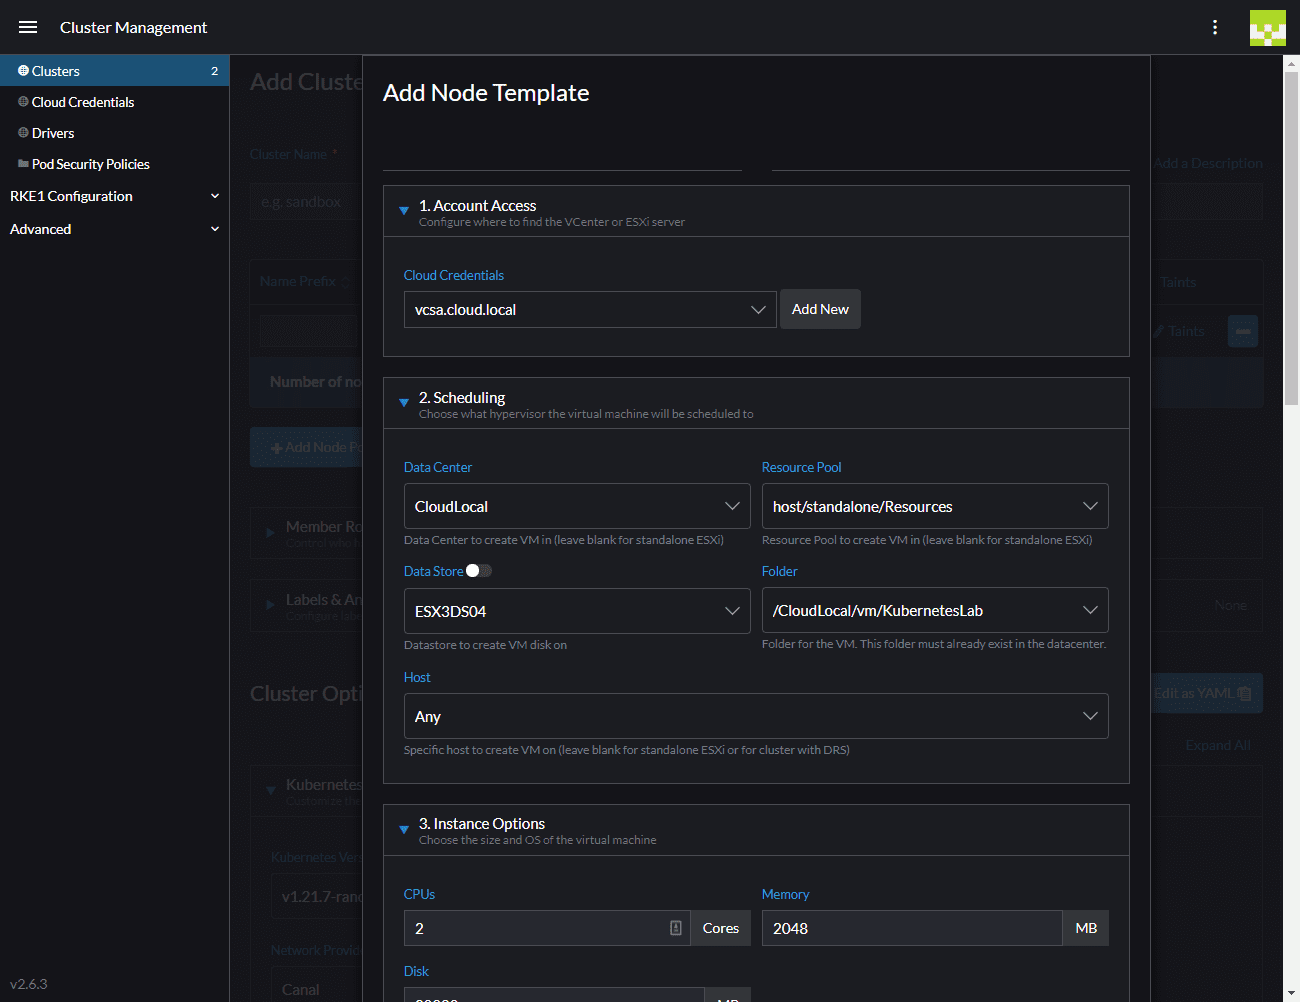
When you click the Plus button, you will be taken to the Add Node Template screen. This configuration screen is where you configure your connection to your VMware vSphere environment. Rancher allows you to connect directly to a host or to your vCenter Server. I am running a vCenter Server 7.0 Update 3 VCSA appliance. Rancher had no issues connecting to the vSphere 7-flavored VCSA which was great to see.
Other configuration can include setting up the infrastructure scheduling details, including:
- DataCenter
- Resoure Pool
- Datastore
- Folder
- Host
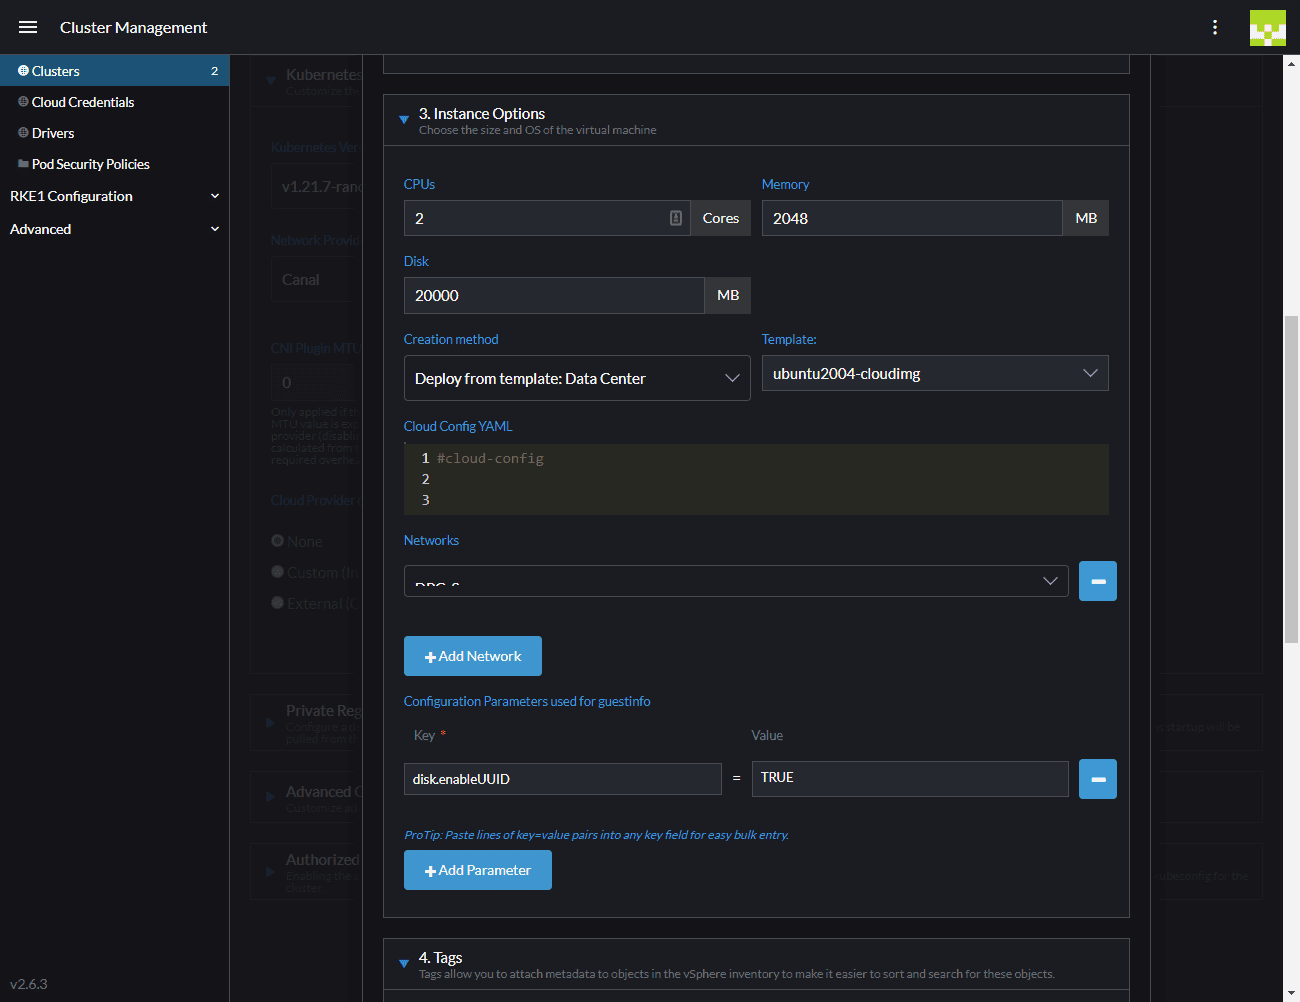
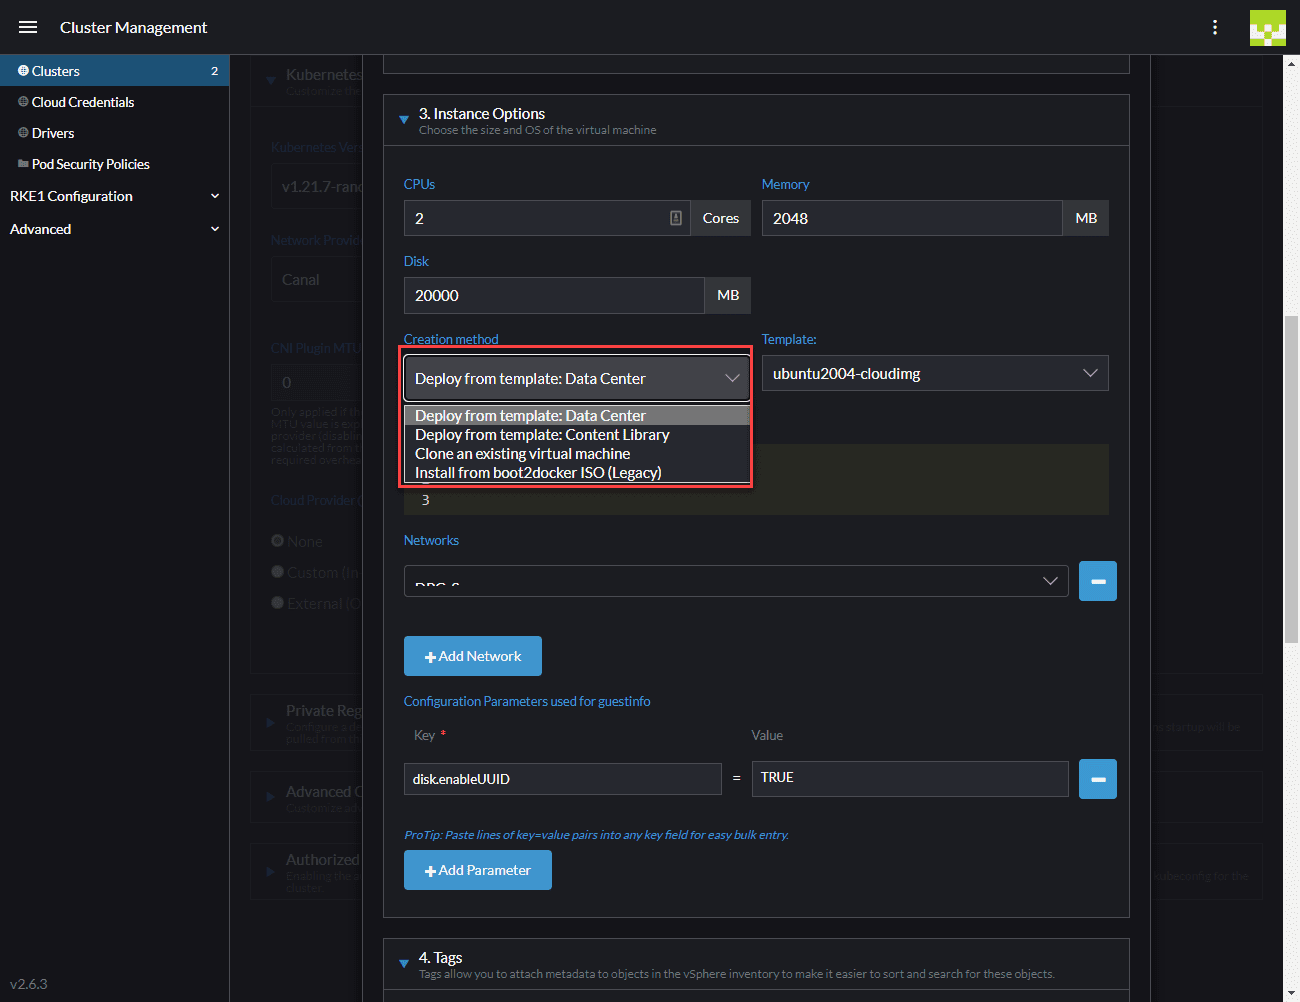
Towards the bottom of the same node template screen, you can configure the “instance options” which are the specs for the instances, including:
- CPUs
- Memory
- Disk
- Creation method
- Template
- Networks
In case you are wondering what the deployment options are, they include:
- Deploy from template: Data Center
- Deploy from template: Content Library
- Clone an existing virtual machine
- Install from boot2docker ISO (Legacy)
After you finalize your node template, back to the Add Cluster screen, make sure you have the roles you want selected, and other configuration options for the cluster, such as the Network Provider.
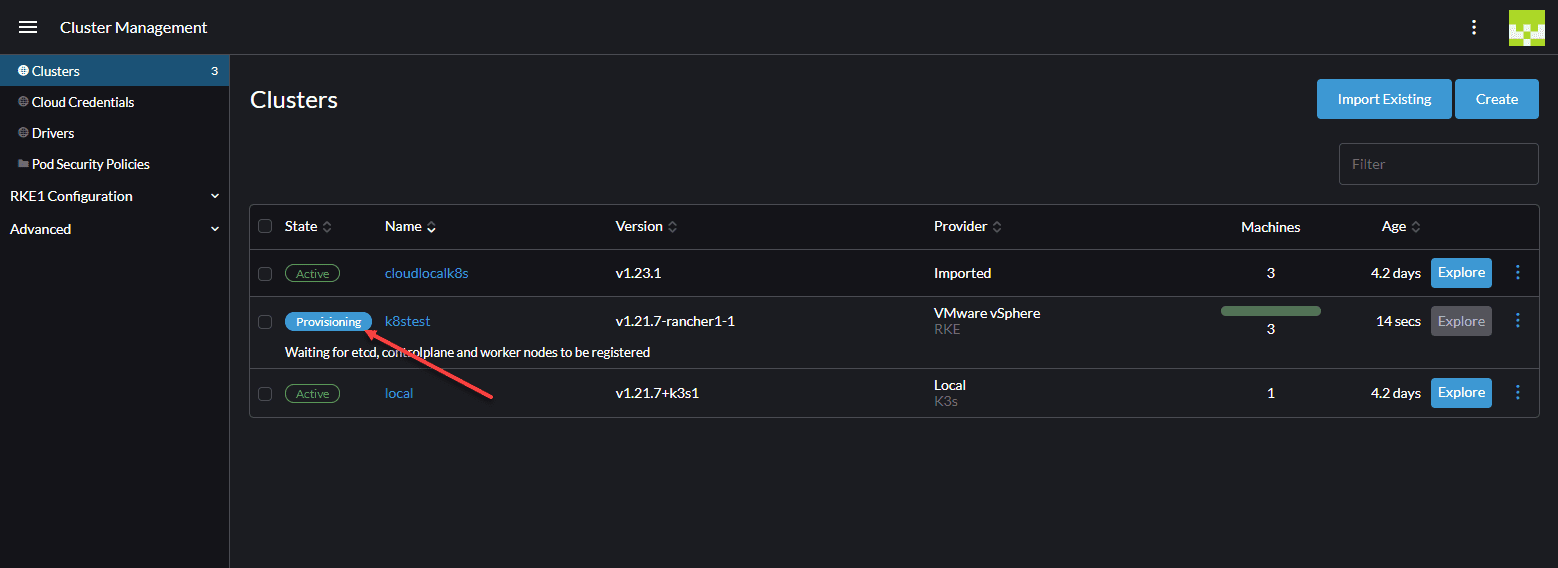
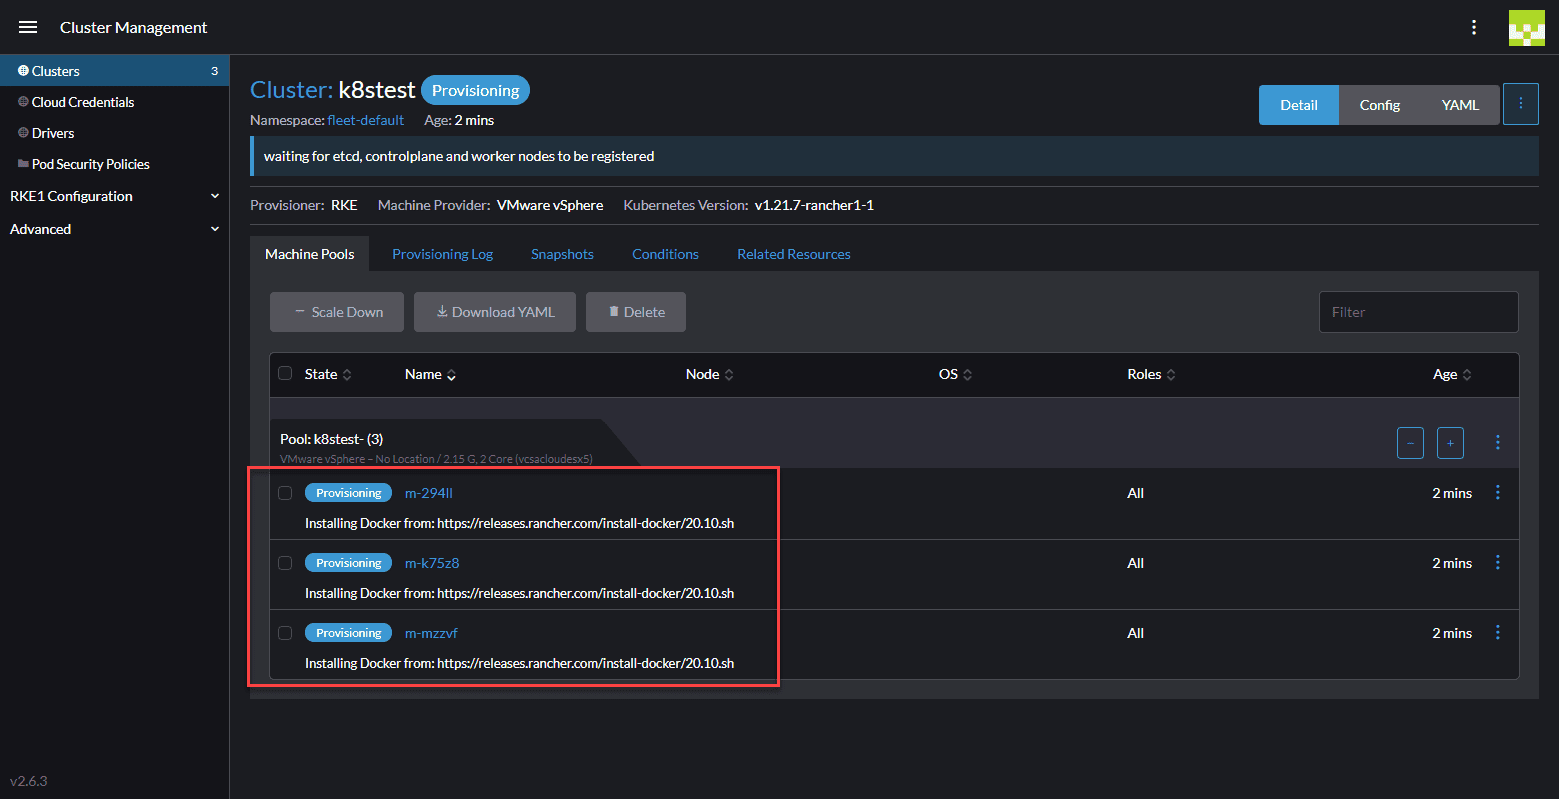
Once you click to create the new cluster, you should see the new cluster name provisioned in Rancher. Also, if you hop over to your vSphere Client, you should see your Kubernetes nodes, provisioned as virtual machines, start cloning from your template.
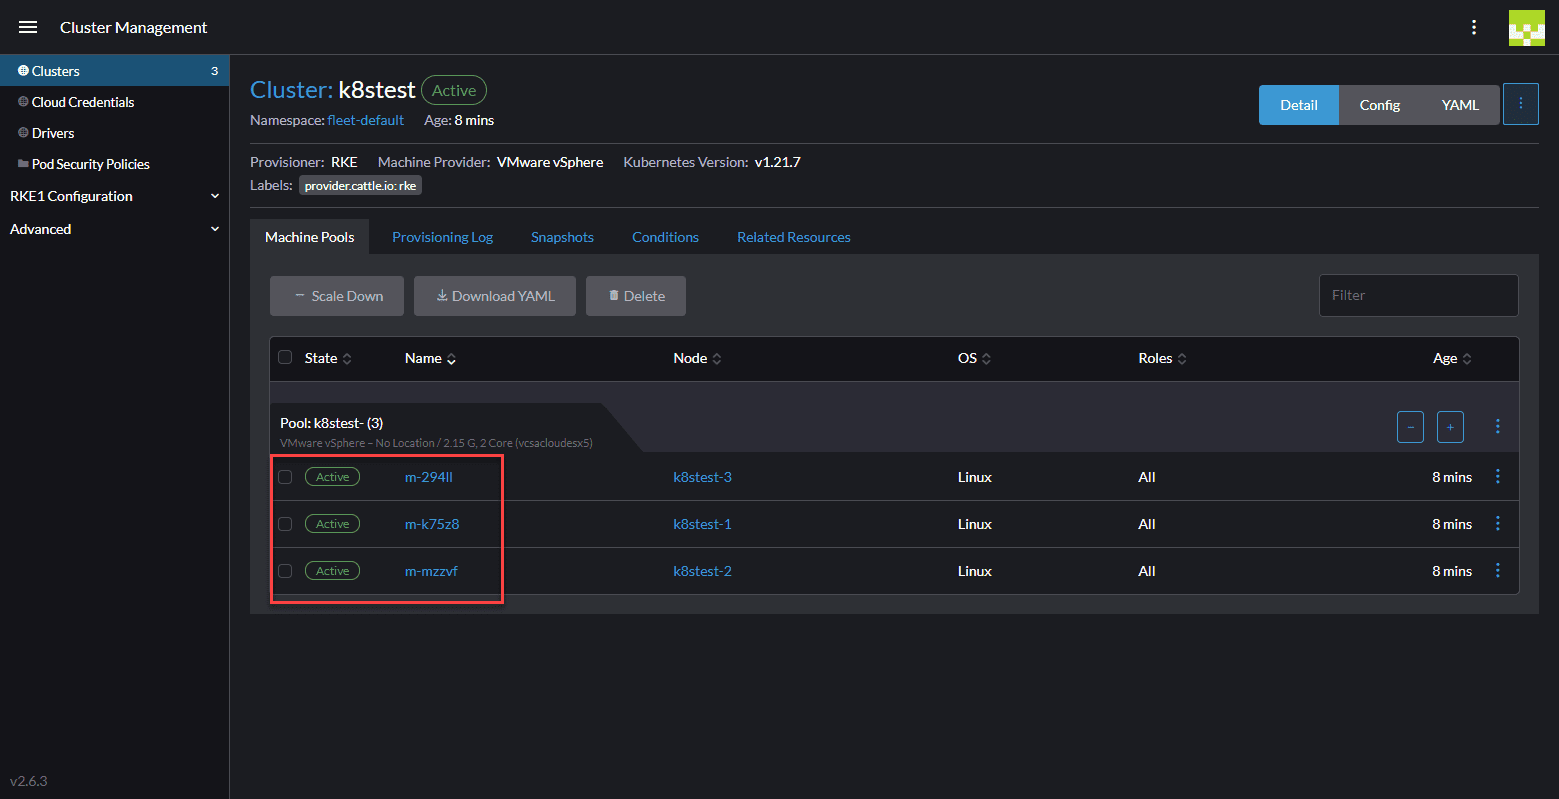
After just a few minutes, you should see your VMware vSphere managed Rancher nodes go to the Active state.
Machines stuck “waiting for SSH to be available”
Let’s quickly talk about your VM template you need to use. If you are like me, the first thing you will try is to use an Ubuntu template that you already have in your vSphere inventory. However, most likely, if you have already installed Ubuntu, either manually, or using Packer, you will see the Rancher provisioning process hang on the following:
- waiting for SSH to be available
If you see this, you need to use a different template. Instead, download the latest Ubuntu cloud image. I used the latest Focal image. The reason for the error is that cloud-init is not in a pristine and ready to configure state when you install the OS manually or using another means such as Packer. Using the cloud image provides the cloud-init environment in the state that Rancher expects when it provisions the Kubernetes nodes.
Wrapping Up
As shown, the process to create Kubernetes Cluster with Rancher and VMware vSphere is fairly straightforward and provides a point-and-click means to provision a new K8s cluster in your existing vSphere environment. Especially for environments that may not be licensed for vSphere with Tanzu, Rancher may provide a suitable alternative to have an easy-to-use management and orchestration solution to easily scale and manage your Kubernetes infrastructure.
You can read the official documentation for Rancher and VMware vSphere here:



0 Comments