Email communications often contain sensitive information or data you don’t want to fall into the wrong hands. Using Encrypted Email communications is an excellent way to bolster the security of your email communications. This post will consider how to send an encrypted email in Outlook, different types of encryption, and how this can be implemented.
What is encryption?
Encryption is a process that transforms data into a format that can only be read by someone possessing the appropriate decryption key, called a private key. This technique safeguards sensitive information from unauthorized access and other security settings, ensuring the confidentiality and integrity of the data during transmission or storage.
What is email encryption?
Encrypted email is the application of encryption techniques to protect the content of emails from being intercepted or read by unintended recipients by sending encrypted messages to recipients. It ensures that only the intended recipient can access and view the content of an email, making it a crucial aspect of securing electronic communication.
Why is encryption important with email?
The importance of email encryption lies in its ability to protect sensitive information from unauthorized access, cyber-attacks, and data breaches. As email is one of the most widely used communication channels, it is often targeted by hackers and cybercriminals seeking to steal sensitive data or disrupt communication.
By encrypting email messages, users can maintain the confidentiality and integrity of their data, reducing the risk of unauthorized access and potential damage by the process to encrypt message contents.
You can encrypt emails in your client using other third-party email providers like a Yahoo mail account and others for encrypted mail.
Email Encryption Options
There are several ways to encrypt emails, including Transport Layer Security (TLS), Secure/Multipurpose Internet Mail Extensions (S/MIME), and Pretty Good Privacy (PGP). Each method offers varying levels of security and ease of use, so users should carefully consider their specific requirements before choosing an encryption method.
How to send a secure email in Outlook—available methods
Outlook, a popular email client from Microsoft, offers several ways to send encrypted messages, including:
Office 365 Message Encryption (OME)
S/MIME
TLS
Each method has its own set of advantages and drawbacks, so it’s essential to understand their differences to determine the most suitable option for your needs.
How to set up your e-mail certificate in Outlook
To use encryption methods like S/MIME in Outlook, you need a digital ID, also known as an email certificate. Follow these steps to set up your email certificate in Outlook:
Obtain a digital ID from a trusted certificate authority (CA).
Install the digital ID on your computer.
In Outlook, navigate to the File tab, click Options, then Trust Center, and select Trust Center Settings.
Go to the Email Security tab and click Import/Export under Digital IDs (Certificates).
Follow the on-screen prompts to import your digital ID.
Once the digital ID is set up, you can use it to encrypt and digitally sign your email messages.
Get a Digital ID for Outlook (encryption and signing certificates)
To get a digital ID, you need to purchase it from a trusted certificate authority (CA) such as GlobalSign, DigiCert, or Comodo. These organizations validate your identity and issue a digital certificate that can be used to sign and encrypt email messages in Outlook.
How to send an encrypted email in Microsoft Office 365
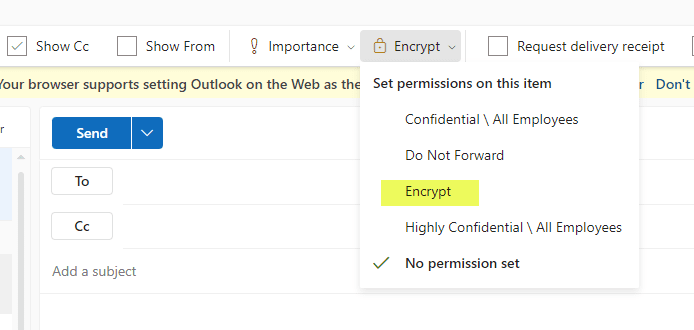
Office 365 users can use Office 365 Message Encryption (OME) to send encrypted emails easily. To do so, follow these steps:
Compose a new email message in Outlook.
Click the Options tab, then click the Encrypt button.
Choose the appropriate encryption option, such as “Encrypt Only” or “Do Not Forward.”
Finish composing your email and click Send.
The email will be encrypted, ensuring only the intended recipient can read it.
Opening a Secure Email in other Mail Clients
When you receive an encrypted email from an Outlook user, you may need to follow specific steps to open the message in your email client. Most modern email clients can automatically decrypt messages encrypted with TLS, while S/MIME and PGP messages may require additional steps, such as installing the sender’s public key or using a compatible email client that supports the encryption method used.
Encrypt all email messages you send in Outlook
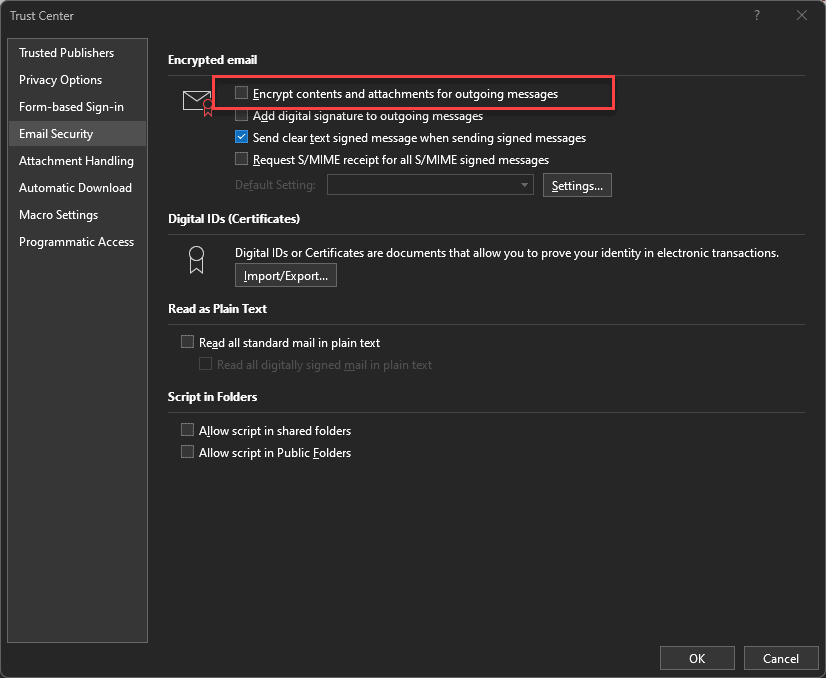
To encrypt all outgoing email messages in Outlook, follow these steps:
Navigate to the File tab, click Options, then Trust Center, and select Trust Center Settings.
Go to the Email Security tab.
Under Encrypted Email, check the box next to “Encrypt contents and attachments for outgoing messages.”
Click OK to save your settings.
Now, all your email messages will be encrypted automatically before being sent.
Email encryption between Outlook and other email clients
Email encryption is not limited to Outlook users; it is possible to encrypt messages between Outlook and other email clients, such as Gmail, Yahoo Mail, or Thunderbird. The key is to ensure that both the sender and recipient are using compatible encryption methods and have the necessary encryption keys or certificates.
Encrypt email in the Microsoft Outlook desktop app
For Outlook email encryption, follow these steps:
Open Outlook and compose a new message.
Click the Options tab and then the Encrypt button.
Select the desired encryption option, such as “Encrypt Only” or “Do Not Forward.”
Finish composing your email and click Send.
The email will be encrypted, ensuring only the intended recipient can read it.
Outlook Mobile app
Encrypting emails in the Outlook mobile app is a useful feature to protect sensitive information when you’re on the go. Here’s how to encrypt emails using the Outlook mobile app on Android and iOS devices:
Step 1: Install the Outlook mobile app
If you haven’t already, download and install the Outlook mobile app from the Google Play Store (Android) or the App Store (iOS).
Step 2: Add your email account
Launch the Outlook app and sign in with your email account. If you haven’t added an account yet, follow the on-screen prompts to set it up.
Step 3: Compose a new email
Tap the “+” icon or the “Compose” button to create a new email. Fill in the recipient’s email address, subject line, and message body as you normally would.
Step 4: Enable encryption
To enable encryption, you will need to access the email options:
On Android: Tap the three vertical dots in the top-right corner of the screen, then select “Encrypt” from the dropdown menu.
On iOS: Tap the gear icon in the top-right corner of the screen, then select “Encrypt” from the menu.
Step 5: Choose the encryption option
Outlook mobile app supports two encryption options: Encrypt Only and Do Not Forward.
Encrypt Only: This option encrypts the email, but the recipient can still forward it to other people.
Do Not Forward: This option encrypts the email and prevents the recipient from forwarding it to others.
Choose the desired encryption option for your email. The app will then display a padlock icon next to the selected option, indicating that the email will be encrypted.
Step 6: Send the encrypted email
After selecting the encryption option, tap the send button to send the encrypted email. Depending on the encryption method, the recipient must follow the steps to decrypt the email.
Note: The availability of encryption options in the Outlook mobile app may depend on your organization’s security settings and your email account type. Contact your organization’s administrator or check your email account settings if you don’t see the encryption options.
Encrypting emails in the Outlook mobile app helps ensure the privacy and security of your sensitive information, even when you’re away from your computer. By following these steps, you can easily send encrypted emails from your mobile device.
Setting Up PGP Email Encryption
Pretty Good Privacy (PGP) is a widely-used encryption standard that can be implemented in various email clients, including Outlook. PGP uses a combination of symmetric-key and public-key cryptography, providing both confidentiality and authentication. Here’s how to set up PGP email encryption:
Step 1: Obtain a PGP tool
You will need a PGP-compatible tool to use PGP with your email client. There are several options available, including:
Gpg4win(for Windows): A comprehensive suite of tools that includes GnuPG, Kleopatra (a certificate manager), and GpgOL (an Outlook plugin).
GPGTools(for macOS): A suite of tools that includes GPG Mail (an Apple Mail plugin) and GPG Keychain (a certificate manager).
Enigmail(for Thunderbird): A plugin for the Thunderbird email client that enables PGP encryption.
Download and install the appropriate PGP tool for your operating system and email client.
Step 2: Generate your PGP key pair
A PGP key pair consists of a public key, which is used to encrypt messages, and a private key, which is used to decrypt them. Follow these steps to generate your PGP key pair:
Launch the certificate manager included in your PGP tool (e.g., Kleopatra for Gpg4win or GPG Keychain for GPGTools).
Select “File” > “New Certificate” or the equivalent option.
Choose “Create a personal OpenPGP key pair.”
Enter your name and email address, and choose a passphrase to protect your private key.
Follow the on-screen instructions to generate your key pair.
Step 3: Share your public key
To receive encrypted emails, you will need to share your public key with your contacts. You can do this by exporting your public key from the certificate manager and sending it to them. They will need to import your public key into their PGP tool to encrypt messages for you.
Step 4: Import your contacts’ public keys
You will need their public keys to send encrypted emails to your contacts. Request their public keys and import them into your certificate manager. This will enable your PGP tool to encrypt messages for your contacts.
Step 5: Configure your email client
Configure your email client to use the PGP tool you installed:
For Gpg4win (Outlook): GpgOL should automatically integrate with Outlook after installation.
For GPGTools (Apple Mail): GPG Mail should automatically integrate with Apple Mail after installation.
For Enigmail (Thunderbird): Follow the Enigmail setup wizard to configure PGP encryption for Thunderbird.
Step 6: Send and receive encrypted emails
With PGP set up in your email client, you can now send and receive encrypted emails:
To send an encrypted email: Compose a new message, and select the option to encrypt the message (usually represented by a padlock icon). The email will be encrypted using the recipient’s public key.
To decrypt an encrypted email: Open the encrypted message, and enter your passphrase when prompted. Your PGP tool will use your private key to decrypt the message.
Prevent forwarding of emails in Outlook
To prevent email recipients from forwarding an email in Outlook, you can use the “Do Not Forward” option provided by Office 365 Message Encryption. When this option is selected, the recipient will not be able to forward, print, or copy the content of the email.
Drawbacks of Outlook’s encryption features—and alternatives
While Outlook’s built-in encryption features offer a level of security for email communication, there are some drawbacks to consider:
Compatibility: S/MIME and PGP may not be compatible with all email clients, making it challenging to exchange encrypted messages with non-Outlook users.
Usability: Setting up encryption in Outlook can be complex, especially for non-technical users.
Limited features: Outlook’s built-in encryption options may lack advanced security features offered by dedicated secure email services.
Alternatively, users can consider third-party encryption tools or secure email services that offer end-to-end encryption and additional security features.
Office 365 Message Encryption (OME)
Office 365 Message Encryption (OME) is a cloud-based email encryption service that allows users to send encrypted messages to any email recipient, regardless of their email provider. OME supports various encryption options, such as “Encrypt Only” and “Do Not Forward,” and integrates seamlessly with Outlook.
How to Send Secure Messages In Outlook Using OME
To send a secure message using OME, follow these steps:
Compose a new email message in Outlook.
Click the Options tab and then the Encrypt button.
Choose the appropriate encryption option, such as “Encrypt Only” or “Do Not Forward.”
Finish composing your email and click Send.
The email will be encrypted using OME, ensuring only the intended recipient can access its contents.
How Your Recipient Opens Your Encrypted Email
When your recipient receives an encrypted email, they may need to follow specific steps to access the message’s content, depending on the encryption method used:
For TLS-encrypted messages, most modern email clients will automatically decrypt the email upon receipt.
For S/MIME-encrypted messages, the recipient must install the sender’s public key in their email client.
For Office 365 Message Encryption, the recipient may need to authenticate with a one-time passcode or sign in to their Microsoft account.
Once the recipient has met the required conditions, they will be able to read the encrypted email.
Receiving Secure Email from Clients (Replies, New Emails)
When you receive secure emails from clients, your email client should automatically decrypt the message if it supports the encryption method used. Depending on the encryption method, you may need to install the sender’s public key or authenticate with a one-time passcode or Microsoft account.
Initial Setup for Office 365 Message Encryption
To set up Office 365 Message Encryption, follow these steps:
Sign in to the Microsoft 365 admin center and navigate to Settings > Services & add-ins > Microsoft 365 Message Encryption.
Click on the “Configure Message Encryption” button.
Follow the on-screen prompts to set up encryption rules, templates, and other settings.
Once OME is configured, you can easily encrypt emails in Outlook.
Outlook Encryption Add-ins for Encrypted E-Mail
There are several third-party Outlook encryption add-ins available that can enhance the security of your email communication. These add-ins may offer additional encryption methods, advanced security features, or improved compatibility with other email clients. Examples include Virtru, SecureMyEmail, and CipherPost Pro.
Using a third-party add-in for sending an Encrypted Message
To use a third-party add-in for sending secure emails in Outlook, follow these steps:
Install the add-in according to the provider’s instructions.
Open Outlook and compose a new email.
Access the add-in’s features, typically available in the Ribbon or as a separate toolbar.
Use the add-in to encrypt your email message and send it securely.
Encrypted Email FAQs
This section addresses some frequently asked questions about encrypted email in Outlook and email encryption in general.
Q: Can I send encrypted emails to recipients who don’t use Outlook?
A: Yes, you can send encrypted emails to recipients using other email clients. The key is to ensure that you and the recipient use compatible encryption methods and have the necessary encryption keys or certificates.
Q: Is decrypting an encrypted email without the proper decryption key possible?
A: No, without the appropriate decryption key, unauthorized recipients cannot decrypt and read the contents of an encrypted email. This is the primary reason why email encryption is an effective way to protect sensitive information.
Q: How do I know if my email client supports email encryption?
A: Most modern email clients support email encryption to some extent through built-in features or compatibility with third-party add-ons. Consult your email client’s documentation or support resources to learn more about its encryption capabilities.
Q: Can I encrypt attachments in Outlook?
A: Yes, when you encrypt an email message in Outlook, the attachments are also encrypted. This ensures that both the message content and attachments are protected from unauthorized access.
Q: What happens if I lose my private encryption key?
A: If you lose your private encryption key, you cannot decrypt encrypted emails sent to you. It’s essential to keep your private key secure and create a backup to prevent losing access to your encrypted emails.
Q: Is there a difference between encrypting emails and digitally signing emails?
A: Yes, encrypting emails protects the content of the message from being intercepted or read by unintended recipients, while digitally signing emails verifies the sender’s identity and ensures the message has not been tampered with during transmission. Both encryption and digital signatures can be used together to provide a high level of security for email communication.
Q: Can I use email encryption on mobile devices?
A: Many mobile email clients support email encryption through built-in features or compatibility with third-party apps. Check your mobile email client’s documentation or support resources for information on its encryption capabilities.
By understanding and utilizing email encryption in Outlook and other email clients, you can ensure that your sensitive information remains secure during electronic communication.
Wrapping up
Sending encrypted emails in Outlook is an excellent way to bolster the security of business and even personal email communications. There are many ways to encrypt emails effectively. Many of these are built into the email in Outlook. There are other ways to encrypt messages using third-party tools, open-source projects, and other ways.


0 Comments